Available in Sage 50 Premium Accounting and higher.
Select Purchase Orders to Create
You can use this to select the inventory items you want to reorder. Unlike the Sage 50Purchase Orders option, the Select for Purchase Orders option lets you create POs for multiple vendors. Following the selection of the range of items you want to include on the orders, you can create and print POs to send to the appropriate vendors.
Selecting the purchase orders you want to create based on your inventory-reorder needs involves a two-step process:
- In the Select for Purchase Orders - Filter Selection window, you select the items for which you want to create purchase orders.
- After you select items and click OK, the Select For Purchase Orders window appears. (You can change the filter selection from this window by clicking the Select button.)
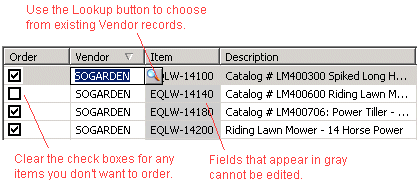
This window lists all items that meet the selection criteria you set in the Filter window. By checking the Order column on the far left, you tell Sage 50 which of these items you want to order, thus creating a purchase order or purchase orders. If you have multiple items from a single vendor selected, then only one PO will be created for these items.
To select the items for which you want to create purchase orders:
- Clear the Order check box for items you do not want to order at this time. Sage 50 assumes you want to order all the items in the window and checks all the Order check boxes by default.
- To clear all Order check boxes, click All (None).
- To select all Order check boxes, click All (Select).
- Some of the item fields that appear in the grid, such Description and Amount, are editable; fields that are not editable appear in gray. The following editable fields include Lookup buttons for making choices from existing records: Vendor, GL Account, and Job.
- To print the Select for Purchase Orders Preview report detailing all the choices you've made in the window, click Preview in the drop-down menu of options on the Print button.
- After making your selections, click the Print button to print the purchase orders you've created. For step-by-step instructions on printing from the Select for Purchase Order window, see Print a Form from a Task Window.

Make changes as needed to the editable information for an item or items.
Note: You can sort the items by the following fields: Vendor, Item, Description, Available, On Hand, Order Qty, Unit Price, GL Account, Job, Quantity on SOs, and Quantity on POs.
You can also sort by U/M (Sage 50 Quantum Accounting).
To sort the items by any of these fields, click the appropriate button at the top of the column. For example, to sort items by ID, click the Item button. Clicking the button once sorts the items in ascending order, and clicking again sorts them in descending order.
The Total Amount field at the bottom right of the window is updated each time an item is checked or unchecked. This shows the total dollar amount of all items from which purchase orders will be created. The Number of POs field reflects the total number of purchase orders that will be created based on the items you've chosen to reorder.