Setting Up Payroll
Paying Employees
Sage 50 Accounting can automatically calculate payroll1 All access to any payroll functionality requires, at minimum, a Sage Business Care Gold or Payroll subscription. taxes based on the employee’s tax table. Note that while you are in history mode, you must calculate and enter payroll taxes yourself. To learn how to issue paycheques to several employees, search for Processing a payroll cheque run.
When Sage 50 Accounting builds your account list, all required payroll accounts are created for you. Before you add your employee records, set up:
- Incomes and deductions you'll use in your business
- Entitlements you provide, and how they are calculated
- Tax rates for unemployment, worker’s compensation, and other employer expenses
- Employer-paid expenses specific to your business (user-defined expenses)
- Starting balances for amounts you owe payroll authorities
You should also review the accounts you will use to track payroll advances, payroll liabilities, wage expenses, and other payroll expenses.
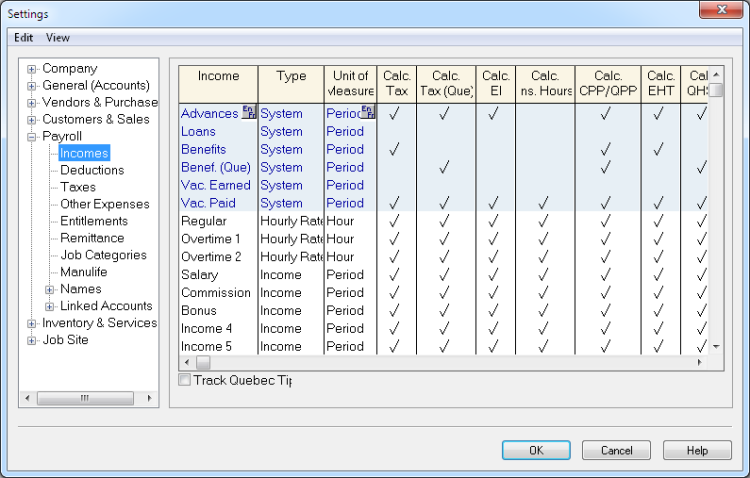
All payroll settings are conveniently located within the Payroll group in the Settings window. To learn more, select an item in the Payroll group, and then click the Help button.

- You can enter basic employee information (contact information, birth date, SIN, hire date) in:
- Employee Ledger: Open the Employees & Payroll page in the Home window. In the Tasks pane, right-click the Employee’s icon and then select Add Employee from the menu.
- Setup Guide: From the Setup menu, select Setup Guide, and then choose the Employee option.
- For each employee, enter the following additional information:
- Taxes. Add tax information, such as the province of employment, and the employee’s federal and provincial claim amounts.
- Income. Select the applicable incomes, enter pay rates and vacation calculations, and the n umber of pay periods per year.
- Deductions. Select the applicable source deductions and enter pay period amounts.
- WCB & Other Expenses. Enter the Worker’s Compensation rate, and pay period contributions for additional employer-paid expenses.
- Entitlements. Record how entitlements, such as sick days, are calculated.
- T4 and RL-1 Information. Enter and review T4 and RL-1 slip information, such as pensionable and insurable earnings.
- Additional Information. You can create up to 5 user-defined fields in which to store additional employee information. If you set up these fields in the Payroll group in the Settings window, then you can enter employee information here.
- Memos. Add reminders and notes.
- Direct Deposit. If you offer direct deposit, turn on the option on the employee’s record and then specify the bank accounts to which their pay is deposited.
Tip: To properly print T4 and RL-1 slips for your employees, enter the employee’s name in this format: Last, First or First Last.
If you have already processed payroll for the year, you will need to record historical information to print the correct amounts on employee T4 and RL-1 slips at the end of the year. For each employee, enter:
- Taxes paid
- Advances paid
- Taxable benefits to date
- Vacation owed and paid
- Wages paid
- Deductions taken
- User-defined employer expenses to date
- Year-to-date pensionable earnings, EI premiums, and for Quebec employees, QPIP premiums
Tip: Check federal and provincial employment standards to learn more about worker’s compensation, vacation pay requirements, and year end reporting.
Make sure you update the opening balance in each linked payroll account.
Open the Report and Form Options window from the Setup menu, and then review your payroll form settings.
- Select an employee from the list.
- Confirm the bank account and cheque number (or direct deposit number, if this employee is set up for direct deposit).
- Confirm the payroll period end date.
- Enter details, such as the hours worked if the employee is paid an hourly wage.
- Preview, and then print the paycheque.
- Click Process to record the transaction, and update account balances and the employee’s record.